Why Proper Positioning Matters
Proper keyboard positioning is the foundation of touch typing. Learning to place your hands correctly from the start will:- Increase your typing speed by reducing unnecessary hand movement
- Improve accuracy by developing consistent muscle memory
- Reduce fatigue during longer typing sessions
- Enable blind typing without looking at the keyboard
Professional typists can achieve speeds of 100+ WPM specifically because they use proper finger positioning and never look at the keyboard.
The Home Row (Fila Hogar)
The home row is the middle row of letter keys on your keyboard where your fingers should rest when not typing. This is your home position — the starting point for all typing.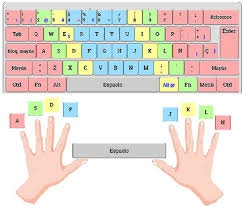
Home Row Keys
The home row consists of eight keys, divided between your left and right hands:Left Hand
A — S — D — FYour left hand fingers rest on these four keys, with your index finger on F.
Right Hand
J — K — L — ÑYour right hand fingers rest on these four keys, with your index finger on J.
Home Position Markers
Most keyboards have small raised bumps or dots on the F and J keys. These tactile markers help you find the home position without looking at your keyboard.Finger Assignments
Each finger is responsible for specific keys. Learning these assignments is essential for developing proper typing technique.Left Hand Assignments
Pinky Finger (Meñique)
Home: AReaches to: Q, Z, Tab, Caps Lock, Shift (left)Your pinky is the weakest finger, so it handles the fewest keys on the edges of the keyboard.
Ring Finger (Anular)
Home: SReaches to: W, X, and numbers above (1, 2)The ring finger works in coordination with your pinky and middle finger.
Middle Finger (Medio)
Home: DReaches to: E, C, and number 3One of your stronger fingers, capable of reaching farther keys efficiently.
Right Hand Assignments
Index Finger (Índice)
Home: J (marked with a dot ●)Reaches to: Y, U, H, N, M, and numbers 6, 7Like the left index finger, this is your most active finger on the right hand. The tactile marker on J is your anchor.
Middle Finger (Medio)
Home: KReaches to: I, comma (,), and number 8A strong finger that handles important punctuation marks.
Ring Finger (Anular)
Home: LReaches to: O, period (.), and number 9Works together with the index and middle fingers for efficient typing.
Thumbs
Both thumbs rest above the Space Bar and are used exclusively for pressing space:Proper Hand Posture
Good posture enhances both speed and comfort:Wrist Position
Wrist Position
- Keep your wrists straight and elevated, not resting on the desk
- Avoid bending your wrists up or to the sides
- Consider using a wrist rest for added support during longer sessions
- Your forearms should be parallel to the floor
Finger Curve
Finger Curve
- Fingers should be gently curved, not flat
- Imagine you’re holding a small ball in each hand
- Strike keys with the fingertip, not the finger pad
- Return immediately to the home position after each keystroke
Hand Angle
Hand Angle
- Hands should be angled slightly outward, following the natural alignment of your arms
- Don’t force your hands into an unnatural straight position
- Your elbows should be at roughly 90 degrees
- Shoulders should be relaxed, not hunched
Body Position
Body Position
- Sit up straight with your back supported
- Keep your feet flat on the floor
- Position your monitor at eye level to avoid neck strain
- Sit at a comfortable distance from the keyboard (roughly one forearm’s length)
Building Muscle Memory
Developing proper keyboard positioning requires consistent practice:Step-by-Step Learning Process
Master the Home Row First
Practice typing only the home row keys (A, S, D, F, J, K, L, Ñ) until you can do it without thinking. This is your foundation.
Add Upper and Lower Rows
Once comfortable with the home row, gradually introduce keys above and below:
- Practice reaching up to the top row (Q, W, E, R, T, Y, U, I, O, P)
- Then practice reaching down to the bottom row (Z, X, C, V, B, N, M)
- Always return your fingers to the home position after each reach
Practice Common Words
Move from individual keys to typing complete words:
- Start with simple, common words
- Focus on maintaining proper finger assignments
- Gradually increase complexity as you improve
Video Tutorial
For a visual demonstration of proper keyboard positioning and typing technique, watch this comprehensive tutorial:Watch: Touch Typing Tutorial
Visual guide to proper hand placement, finger assignments, and typing technique
Common Positioning Mistakes
Quick Reference: Home Row Keys
Here’s a quick visual reference for the home row:Practice Exercises
Try these exercises to reinforce proper positioning:Exercise 1: Home Row Only
Exercise 1: Home Row Only
Type the following repeatedly, focusing on keeping your fingers on the home row:Goal: Type without looking at your hands at all.
Exercise 2: Reaching Practice
Exercise 2: Reaching Practice
Practice reaching to adjacent rows while maintaining home position:Goal: Return to home position after each word.
Exercise 3: Speed Building
Exercise 3: Speed Building
Once you’re comfortable, use WPM Typing Tutor’s levels:
- Start with Easy level
- Maintain 95%+ accuracy
- Gradually increase speed as accuracy remains high
- Progress to Medium when consistently hitting 40+ WPM
Next Steps
Now that you understand proper keyboard positioning:How to Play
Learn the game mechanics and scoring system
Improve Your Speed
Discover advanced techniques to increase your WPM